Category: DIY • Food & Crafts

  • Heartwarming Blueberry Scones

    Ever since I studied abroad in Europe back in 2016, I’ve dreamed every day since of the delicious pastries. The scones, croissants, and most of all Pain au chocolat. These blueberry scones are just the beginning of my pastry obsession. These light and fluffy scones hit the spot. Don’t skip the sugar topping right before going into the oven, it makes the tops extra crisp. Whether for breakfast or dessert these scones are sure to please.

    Blueberry scones, in my honest opinion, teeter right on the edge of being healthy with a powerful boost of flavor. Without the icing, these are essentially fruit biscuits. And what could be so unhealthy about fruit biscuits? Absolutely nothing. Give it a try for yourself.

    Heartwarming Blueberry Scones

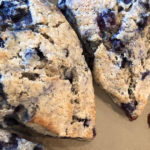
    Ever since I studied abroad in Europe, I've been craving pastries. These light and fluffy scones hit the spot. Don't skip the sugar topping right before going into the oven, it makes the tops extra crisp. Whether for breakfast or dessert these scones are sure to please.

    • 2 ¼ cups flour
    • ½ cup sugar
    • 2 ½ tsp baking powder
    • 1 tsp ground cinnamon
    • ½ tsp salt
    • ½ cup unsalted butter, frozen
    • ⅔ cup heavy cream
    • 1 egg, large
    • 1 ½ tsp vanilla extract
    • 2 cups blueberries, frozen
    • coarse sugar (or regular sugar will work)
    • 2 tbsp heavy cream (for brushing on top)

    Icing

    • ½ cup powdered sugar
    • 1 tbsp milk
    1. Whisk together dry ingredients: flour, sugar, baking powder, cinnamon, and salt in a large (preferably metal) bowl.

    2. Grate frozen butter using a box grater and combine with the flour mixture using a pastry cutter (or two butter knives or a fork works also). Set aside in the fridge or freezer.

    3. In a small bowl, whisk together ⅔ cup heavy cream, the egg, and vanilla.

    4. Drizzle cream mixture over the flour mixture, add blueberries, then mix together with a spatula until everything is moist. Combine in this order. (Otherwise, the blueberries will clump up.)

    5. Transfer mixture to a lightly floured countertop. If mixture appears too moist, sprinkle lightly with flour on top. If too dry, add a little more heavy cream. Work the dough, separating the dough into 2 equal parts.

    6. Press each half of the dough into two 6-inch discs, about 1 inch thick. Cut each disc into 8 wedges with a sharp knife, pizza cutter or bench scraper.

    7. Place wedges on a baking stone or cookie sheet lined with parchment paper about 2 inches apart.

    8. Brush scones with 1-2 tbsp heavy cream and sprinkle with sugar (or coarse sugar if you have it) to give the top a crunch.

    9. Free up a shelf in your refrigerator to chill the scones for at least 15 minutes.

    10. In the meantime, preheat the oven to 400°F.

    11. Bake scones for 22 minutes or until golden brown around the edges.

    12. While scones are baking, whip up quick and easy icing by mixing ½ cup of powdered sugar with 1 tbsp milk in a small bowl.

    13. Remove scones from the oven and cool briefly before topping with icing.

    PRO TIPS:

    1. Keep several sticks of butter in your freezer for impulse baking.
    2. Putting your metal mixing bowl in the freezer before you begin will aid in keeping the dough extra cool as you prepare your delicious scones.
    3. These scones are also delicious with frozen strawberries if you’re not a blueberry fan!

    Don’t forget, Join the Tribe! Subscribe. We can’t wait to connect with you.

  • Grandma’s Chocolate Chip Cookies

    I can still remember the days of going to visit grandma, and aside from the rolly chairs at the kitchen table, my next favorite thing was the chocolate chip cookie bars that always seemed to live on the counter. They were fluffy, they were chocolatey, and they were an excellent pair with a cold glass of milk.

    Does anyone else believe there are only two types of cookies that rule this world?

    1. There are the fluffy, airy cookies that require dipping in milk.
    2. Then there are the dense, gooey kind that you can eat dozens at a time, without a glass of milk required.

    I’m a firm believer in this theory and a devote consumer of both types.

    These chocolate chip cookies, however, strictly type #1. My husband claims these cookies are the best of show between both categories. Grandma Fowler’s recipe makes dozens of perfectly fluffy cookies (or brownie/cookie bar) perfect for milk dunking.

    Grandma Fowler's Chocolate Chip Cookies

    Soft and fluffy chocolate chip cookies, paired perfectly with an ice-cold glass of milk for dipping! Delicious as cookies or bars.

    • 2 sticks butter
    • ⅔ cup sugar
    • ⅔ cup brown sugar
    • 2 tsp vanilla
    • 1 tbsp water
    • 2 eggs
    • 3 cups flour
    • 1 tsp baking soda
    • salt (to taste)
    • 1 cup chocolate chips
    1. In a large mixing bowl, blend together butter, sugar, brown sugar, vanilla, and water until fluffy.

    2. Add eggs and mix well.

    3. Sprinkle gradually with remaining ingredients (flour, baking soda, salt) and blend together until combined.

    4. Fold in chocolate chips.

    5. Spoon onto a cookie sheet or baking stone.

    6. Bake cookies in 350°F oven for 8 to 10 minutes or until golden brown on top.

    7. Remove from oven, let cool for 2 minutes, move to a cooling rack and enjoy with a glass of milk.

    PRO TIP: Use this scoop when baking the cookies. The smaller the scoop, the more cookies there are to enjoy later.

    Don’t forget, Joint the Tribe! Subscribe. We can’t wait to connect with you.

  • Jessie’s Homemade Bread

    Quick and easy homemade white bread anyone can bake and enjoy!

    My history of cooking and baking isn’t anything to write home about. In fact, I was given a refrigerator magnet to commemorate my struggles. But the times have changed now.

    Over the last several months, I’ve been making bread nearly once weekly and loved every slice. Sharing my breadmaking experiences with friends and family is a lot of fun for me. I typically hear some sort of response like, “Wow! Do you use a bread machine?” When I get that response I have to laugh. It makes me feel a bit accomplished knowing I made the bread without a bread machine, but this incredibly easy bread recipe remains my little secret. That is, until now! Now you’re in on my secret and you too can enjoy quick and easy bread in your own home!

    My kitchen aid mixer makes this recipe a breeze and I can’t live without my Rachel Ray loaf pans. Get two for yourself today and you’ll be on your way to delicious homemade bread in no time!

    Jessie's Homemade Quick and Easy White Bread

    The easiest homemade bread recipe with only 6 ingredients!

    • 2 cups water, very warm (110-120°)
    • ⅔ cup sugar
    • 1 pkg yeast
    • 6 cups flour
    • ¼ cup oil
    • 1 ½ tsp salt
    1. Add water to a large mixing bowl. Dissolve sugar in the water. Sprinkle over the top with yeast. Let the yeast grow and become foamy on top. (About 15 minutes)

    2. Add salt, oil and half the flour to the yeast. Mix together.

    3. Change to your dough hook. Add remaining flour and mix until the dough is pulling away from the sides of the mixing bowl.

    4. Transfer dough to a lightly floured surface and knead briefly.

    5. Once done kneading, form dough into a round, tucking under the sides until you achieve a nice smooth top.

    6. Pour about 1 tablespoon oil into a bowl twice the size of your dough. Coat the bowl completely with oil, then place the dough top first into a bowl, flipping to cover both sides of the dough with oil. Cover with saran wrap and place in a warm, draft-free area and let rise until the dough doubles in size. (About 1 hour)

    7. Once the dough has doubled, remove saran wrap cover and punch down with a floured fist.

    8. Transfer dough again to a lightly floured surface, flatten out into a rectangle and cut the dough in half.

    9. Then, roll each half into a loaf, massaging the ends together to form a smooth loaf. Brush off any excess flour and place each loaf into a greased loaf pan.

    10. Cover with saran wrap, place in a warm, draft-free area and let rise until each loaf is double in size. (About 30-50 minutes)

    11. Pre-heat oven to 350°F.

    12. Once loaves are double in size, use a very sharp knife to carve small tribal marks (grooves or more simply, openings) to uniquely identify your bread as well as eliminate cracks as the bread continues to rise and bake. Make each loaf your own!

    13. Bake loaves for 30 minutes, not a second more.

    14. Pull out of the oven and brush tops of loaves with butter. Let rest 10 minutes before removing from loaf pans and transferring to a cooling rack.

    15. Enjoy! It doesn't get any better than fresh-baked warm bread with strawberry butter on top.

    Don’t forget to share pictures of your fresh-baked homemade bread on social! Tag us @Tribble_Tribe with #MyBreadTribe

    Don’t forget, Join the Tribe! Subscribe. We can’t wait to connect with you.

  • Grandma’s Sour Cream Coffee Cake

    Do you ever take a bite of a seriously scrumptious [insert any food] and slowly begin chewing only to realize there are nuts hidden inside. Surely I’m not the only person out there who can’t stand nuts in my cake. I’ll take a good handful of plain peanuts any day, but please don’t put nuts in my cake. Grandma Vera’s Coffee Cake is the best coffee cake, and without the nuts, my husband and I will both eat it! This sour cream coffee cake is for the picky eater in your family. It’s delicious and full of sweet cinnamon filling.

    The secret ingredient to Grandma’s Coffee Cake is, you guessed it, sour cream! And, the trick to getting the coffee cake just right is the batter to filling ratio. I refuse to pour the batter in the pan anymore because just the thought of having the filling slightly off-center gives me anxiety. So, my gracious, servant-hearted husband pours the batter now! He always does a terrific job.

    So, my challenge to you: can you get the filling perfectly centered in your coffee cake batter? Please, share your pictures and tag me! @TribbleTribe with #GrandmasCoffeeCake


    Grandma’s Sour Cream Coffee Cake

    Don’t forget to grab yourself a pastry cutter before you begin. If you don’t have one already, quick, order one now! You’ll be glad you did when you want to make Heartwarming Blueberry Scones tomorrow.

    Grandma's Sour Cream Coffee Cake

    Grandma's utterly delicious coffee cake, made with secret ingredient – sour cream, will melt-in-your-mouth and

    • 2 cup flour
    • 1 cup sugar
    • 1 cup sour cream
    • ½ cup butter ((one stick))
    • 3 eggs
    • 2 tsp baking powder
    • 1 tsp baking soda
    • ¼ tsp salt
    • 1 tbsp vanilla

    Filling

    • 1 tbsp butter, melted
    • ½ cup brown sugar
    • 2 tbsp flour
    • 2 tsp cinnamon
    • 1 tsp vanilla
    1. Preheat oven to 350°F.

    2. Whisk together dry ingredients: flour, sugar, baking powder, baking soda, and salt.

    3. Cut in butter with a pastry cutter (or two butter knives works as well).

    4. Blend in eggs, beaten with sour cream. Mix well and set aside.

    5. For the filling, in a small bowl, melt remaining butter (1 tablespoon).

    6. Add in the rest of the ingredients: brown sugar, flour, cinnamon, and vanilla. Combine all ingredients until it becomes a damp sand texture.

    7. Spray a bundt pan (or your pan of choice) with cooking spray on all sides.

    8. Pour ½ of your sour cream mixture into the bundt pan. Sprinkle with the filling then cover with the remaining batter.

    9. Bake 40-50 minutes in a 350° oven, being sure not to overcook. The coffee cake should be browned on top and a toothpick should come out clean when inserted into the center of the cake.

    10. Enjoy!

    TIPS:

    • Don’t try to substitute for the sour cream. For some reason, I’ve found the sour cream has magical fluffy powers that substitutes just don’t have.
    • If you prefer a light brown top to your cake, use oil and flour to lightly powder your pan before pouring in the batter.
    • To prevent your cake from potentially breaking as you flip it out of your pan, try to keep the filling completely encased in the batter so it doesn’t leak to the outer edges and get into a sticky situation.
    • Storing on the counter in a cake stand works great for us, keeping the cake fresh and in view for all to see and enjoy.
    Grandma's Sour Cream Coffee Cake
    Grandma’s Sour Cream Coffee Cake

    Don’t forget, Joint the Tribe! Subscribe. We can’t wait to connect with you.